單體式的 Agent 架構在定義明確的問題上可以很有效,但面對複雜、跨領域的任務,能力往往就受限了。Multi-Agent Collaboration(多 Agent 協作)模式的解法,是把系統設計成一組分工明確、各有專長的 Agent 的合作團隊。這個做法的前提是任務分解:把高層次的目標拆成分立的子問題,每個子問題交給最適合的 Agent──具備該任務所需的特定工具、資料存取權或推理能力。
舉例來說,一個複雜的研究查詢可以拆開來,分派給負責檢索資訊的研究 Agent、負責統計處理的資料分析 Agent,以及負責產出最終報告的綜合 Agent。這種系統的效力不只來自分工,更關鍵的是 Agent 之間的通訊機制:需要標準化的通訊協定和共享的本體(ontology),讓 Agent 能交換資料、委派子任務、協調彼此的行動,確保最終產出是連貫的。
這種分散式架構有幾個優點:模組化更好、可擴展性更高、也更穩健──單一 Agent 掛掉不見得會拖垮整個系統。協作能產生綜效:Multi-Agent 系統的整體表現,超越團隊中任何單一 Agent 的能力上限。
模式概觀
Multi-Agent Collaboration 模式指的是設計「多個獨立或半獨立的 Agent 為共同目標協作」的系統。每個 Agent 通常有明確的角色、與整體目標對齊的具體目標,可能還有各自不同的工具或知識庫。這個模式的威力來自 Agent 之間的互動與綜效。
協作有多種形式:
-
循序交接: 一個 Agent 完成任務後,把輸出交給下一個 Agent 接手 pipeline 的下一步(類似 Planning 模式,但明確由不同的 Agent 分工)。
-
平行處理: 多個 Agent 同時處理問題的不同部分,結果稍後再合併。
-
辯論與共識: 觀點和資訊來源各異的 Agent 進行討論、評估選項,最終達成共識或做出更有依據的決定。
-
階層結構: 管理者 Agent 根據工具存取權或外掛能力,動態地把任務委派給工作者 Agent,再綜合它們的結果。每個 Agent 也可以各自負責一組相關的工具,而不是由單一 Agent 包辦所有工具。
-
專家團隊: 不同領域的專家 Agent(例如研究員、寫手、編輯)協力產出複雜的成果。
-
批評者-審查者: 一批 Agent 先產出初版成果(計畫、草稿、答案),第二批 Agent 再嚴格審視這些產出:是否符合政策、安全、法規、正確性、品質,以及與組織目標的一致性。原創作者或最終的 Agent 根據回饋修訂產出。這個模式對程式碼生成、研究寫作、邏輯檢查、倫理對齊特別有效,好處包括更穩健、品質更好、幻覺或錯誤的機率更低。
一個 Multi-Agent 系統(見圖 1)基本上由三件事構成:劃定各 Agent 的角色與職責、建立 Agent 交換資訊的通訊管道,以及制定引導協作的任務流程或互動協定。
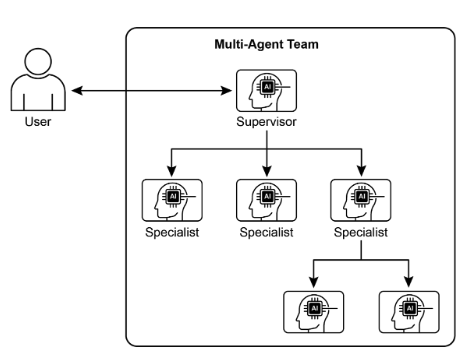
圖 1:Multi-Agent 系統的例子。
CrewAI 和 Google ADK 這類框架就是為了支援這個典範而打造的,提供了定義 Agent、任務及其互動程序的結構。這個做法特別適合這些挑戰:需要多種專門知識、包含多個分立階段,或能受益於並行處理和跨 Agent 資訊交叉驗證的問題。
實際應用與使用情境
Multi-Agent Collaboration 是適用於許多領域的強力模式:
- 複雜研究與分析: 一組 Agent 可以協作完成研究專案:一個專門搜學術資料庫、一個負責摘要發現、第三個找趨勢、第四個把資訊綜合成報告──就像人類研究團隊的運作方式。
- 軟體開發: 想像 Agent 們協作開發軟體:一個當需求分析師、一個生成程式碼、第三個做測試、第四個寫文件,彼此傳遞產出來建構和驗證元件。
- 創意內容生成: 製作一檔行銷活動,可以由市場研究 Agent、文案 Agent、平面設計 Agent(使用圖片生成工具)和社群排程 Agent 一起完成。
- 金融分析: Multi-Agent 系統可以分析金融市場:各 Agent 分別負責抓股票資料、分析新聞情緒、做技術分析、產出投資建議。
- 客服升級: 第一線客服 Agent 處理初步詢問,遇到複雜問題時升級給專家 Agent(例如技術專家或帳務專員)──依問題複雜度做循序交接的例子。
- 供應鏈最佳化: Agent 可以代表供應鏈的不同節點(供應商、製造商、經銷商),協作最佳化庫存水位、物流和排程,因應需求變化或突發中斷。
- 網路分析與修復: 自主化營運能大大受益於 Agentic 架構,尤其是故障定位。多個 Agent 可以協作分流和修復問題、建議最佳行動。這些 Agent 也能與傳統的機器學習模型和工具整合:既利用既有系統,又同時享有生成式 AI 的優勢。
定義專門的 Agent 並精心調度它們之間的關係,讓開發者能建構出模組化更好、可擴展性更高的系統,有能力應付單一整合式 Agent 難以招架的複雜度。
Multi-Agent 協作:互動關係與通訊結構
要設計有效的 Multi-Agent 系統,必須先理解 Agent 之間互動與通訊的各種方式。如圖 2 所示,互動關係與通訊模型有一整個光譜:從最簡單的單一 Agent,到複雜的客製化協作框架。每種模型都有獨特的優缺點,影響 Multi-Agent 系統整體的效率、穩健性和適應力。
1. 單一 Agent
最基本的層次是「單一 Agent」:自主運作,不與其他實體直接互動或通訊。這個模型容易實作和管理,但能力天生受限於單一 Agent 的範圍和資源。它適合那些能拆成獨立子問題、每個子問題都能由一個自給自足的 Agent 解決的任務。
2. 網狀(Network)
「網狀」模型是邁向協作的重要一步:多個 Agent 以去中心化的方式直接互動。通訊通常是點對點的,可以共享資訊、資源,甚至任務。這個模型有韌性──一個 Agent 掛掉不一定癱瘓整個系統。但在龐大、缺乏結構的網路中,管理通訊開銷、確保決策的一致性可能很有挑戰。
3. 監督者(Supervisor)
在「監督者」模型中,由一個專職的 Agent(監督者)監管並協調一群下屬 Agent 的活動。監督者是通訊、任務分配和衝突解決的中央樞紐。這種階層結構的權責清楚,管理和控制都比較簡單;但它引入了單點故障(監督者本身),而且當下屬太多或任務太複雜時,監督者可能成為瓶頸。
4. 監督者作為工具
這個模型是「監督者」概念的細緻延伸:監督者的角色不再是直接的指揮控制,而是為其他 Agent 提供資源、指引或分析支援。監督者可以提供工具、資料或計算服務,幫助其他 Agent 更有效地完成任務,而不必事事下令。這個做法想要善用監督者的能力,又不施加僵硬的由上而下控制。
5. 階層式(Hierarchical)
「階層式」模型把監督者概念擴展成多層的組織結構:多個層級的監督者,上層監督者管理下層監督者,最底層才是實際執行的 Agent。這種結構適合能逐層分解的複雜問題──每一層負責管理自己的子問題。它為可擴展性和複雜度管理提供了結構化的做法,讓決策能在明確界定的範圍內分散進行。
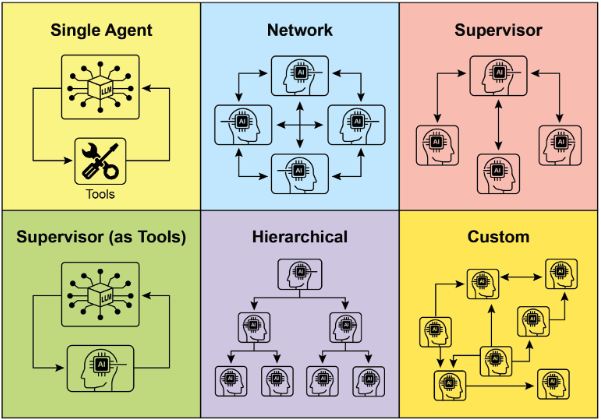
圖 2:Agent 以各種方式通訊與互動。
6. 客製化(Custom)
「客製化」模型代表 Multi-Agent 系統設計的終極彈性:針對特定問題或應用的需求,量身打造獨特的互動關係與通訊結構。它可以是混合式做法──結合前述各模型的元素──也可以是因應環境的特殊限制與機會而生的全新設計。客製化模型通常出於這些需求:針對特定效能指標最佳化、應付高度動態的環境,或把領域知識融入系統架構。設計和實作客製化模型,通常需要對 Multi-Agent 系統原理有深刻理解,並仔細考量通訊協定、協調機制和湧現行為(emergent behaviors)。
總結來說,為 Multi-Agent 系統選擇互動關係與通訊模型,是一個關鍵的設計決策。每種模型各有利弊,最佳選擇取決於幾個因素:任務的複雜度、Agent 的數量、期望的自主程度、對穩健性的要求,以及可接受的通訊開銷。Multi-Agent 系統的未來發展,很可能會繼續探索和打磨這些模型,並發展出協作智慧的新典範。
實作範例(CrewAI)
這段 Python 程式碼用 CrewAI 框架定義一個 AI 團隊(crew),產出一篇關於 AI 趨勢的部落格文章。它先設定環境、從 .env 檔載入 API key。應用的核心是定義兩個 Agent:一個研究員負責找出並摘要 AI 趨勢,一個寫手根據研究成果撰寫部落格文章。
對應地定義了兩個任務:一個做趨勢研究,另一個寫部落格文章,且寫作任務依賴研究任務的輸出。這些 Agent 和任務組成一個 Crew,指定循序流程依序執行任務。Crew 以這些 Agent、任務和語言模型(具體是 “gemini-2.0-flash”)初始化。main 函式用 kickoff() 方法執行這個 crew,調度 Agent 之間的協作產出成果。最後程式印出 crew 執行的最終結果,也就是生成的部落格文章。
import os
from dotenv import load_dotenv
from crewai import Agent, Task, Crew, Process
from langchain_google_genai import ChatGoogleGenerativeAI


def setup_environment():
    """Loads environment variables and checks for the required API key."""
    load_dotenv()
    if not os.getenv("GOOGLE_API_KEY"):
        raise ValueError("GOOGLE_API_KEY not found. Please set it in your .env file.")


def main():
    """
    Initializes and runs the AI crew for content creation using the latest Gemini model.
    """
    setup_environment()

    # Define the language model to use.
    # Updated to a model from the Gemini 2.0 series for better performance and features.
    # For cutting-edge (preview) capabilities, you could use "gemini-2.5-flash".
    llm = ChatGoogleGenerativeAI(model="gemini-2.0-flash")

    # Define Agents with specific roles and goals
    researcher = Agent(
        role='Senior Research Analyst',
        goal='Find and summarize the latest trends in AI.',
        backstory="You are an experienced research analyst with a knack for identifying key trends and synthesizing information.",
        verbose=True,
        allow_delegation=False,
    )

    writer = Agent(
        role='Technical Content Writer',
        goal='Write a clear and engaging blog post based on research findings.',
        backstory="You are a skilled writer who can translate complex technical topics into accessible content.",
        verbose=True,
        allow_delegation=False,
    )

    # Define Tasks for the agents
    research_task = Task(
        description="Research the top 3 emerging trends in Artificial Intelligence in 2024-2025. Focus on practical applications and potential impact.",
        expected_output="A detailed summary of the top 3 AI trends, including key points and sources.",
        agent=researcher,
    )

    writing_task = Task(
        description="Write a 500-word blog post based on the research findings. The post should be engaging and easy for a general audience to understand.",
        expected_output="A complete 500-word blog post about the latest AI trends.",
        agent=writer,
        context=[research_task],
    )

    # Create the Crew
    blog_creation_crew = Crew(
        agents=[researcher, writer],
        tasks=[research_task, writing_task],
        process=Process.sequential,
        llm=llm,
        verbose=2,  # Set verbosity for detailed crew execution logs
    )

    # Execute the Crew
    print("## Running the blog creation crew with Gemini 2.0 Flash... ##")
    try:
        result = blog_creation_crew.kickoff()
        print("\n------------------\n")
        print("## Crew Final Output ##")
        print(result)
    except Exception as e:
        print(f"\nAn unexpected error occurred: {e}")


if __name__ == "__main__":
    main()
接下來深入 Google ADK 框架的更多範例,重點放在階層式、平行與循序的協調典範,以及「把 Agent 當作工具」的實作。
實作範例(Google ADK)
下面的程式碼範例示範如何在 Google ADK 中透過建立親子關係,搭出階層式的 Agent 結構。程式碼定義了兩種 Agent:LlmAgent,以及一個繼承 BaseAgent 的自訂 TaskExecutor Agent。TaskExecutor 為特定的非 LLM 任務設計,在這個例子裡只是簡單地產出一個「Task finished successfully」事件。名為 greeter 的 LlmAgent 以指定的模型和 instruction 初始化,扮演友善的迎賓員;自訂的 TaskExecutor 實例化為 task_doer。接著建立名為 coordinator 的父層 LlmAgent,同樣設定模型和指令:把打招呼委派給 greeter、把任務執行委派給 task_doer。greeter 和 task_doer 被加入 coordinator 的子 Agent,建立親子關係。程式碼接著用 assert 確認關係設定正確,最後印出階層建立成功的訊息。
from typing import AsyncGenerator

from google.adk.agents import LlmAgent, BaseAgent
from google.adk.agents.invocation_context import InvocationContext
from google.adk.events import Event


# Correctly implement a custom agent by extending BaseAgent
class TaskExecutor(BaseAgent):
    """A specialized agent with custom, non-LLM behavior."""
    name: str = "TaskExecutor"
    description: str = "Executes a predefined task."

    async def _run_async_impl(self, context: InvocationContext) -> AsyncGenerator[Event, None]:
        """Custom implementation logic for the task."""
        # This is where your custom logic would go.
        # For this example, we'll just yield a simple event.
        yield Event(author=self.name, content="Task finished successfully.")


# Define individual agents with proper initialization
# LlmAgent requires a model to be specified.
greeter = LlmAgent(
    name="Greeter",
    model="gemini-2.0-flash-exp",
    instruction="You are a friendly greeter.",
)

# Instantiate our concrete custom agent
task_doer = TaskExecutor()

# Create a parent agent and assign its sub-agents
# The parent agent's description and instructions should guide its delegation logic.
coordinator = LlmAgent(
    name="Coordinator",
    model="gemini-2.0-flash-exp",
    description="A coordinator that can greet users and execute tasks.",
    instruction="When asked to greet, delegate to the Greeter. When asked to perform a task, delegate to the TaskExecutor.",
    sub_agents=[
        greeter,
        task_doer,
    ],
)

# The ADK framework automatically establishes the parent-child relationships.
# These assertions will pass if checked after initialization.
assert greeter.parent_agent == coordinator
assert task_doer.parent_agent == coordinator

print("Agent hierarchy created successfully.")
下面這段程式碼說明如何用 Google ADK 的 LoopAgent 建立迭代式的工作流程。程式碼定義了兩個 Agent:ConditionChecker 和 ProcessingStep。ConditionChecker 是自訂 Agent,負責檢查 session 狀態中的 “status” 值:如果是 “completed”,就升級(escalate)一個事件來停止迴圈;否則產出一個繼續迴圈的事件。ProcessingStep 是使用 “gemini-2.0-flash-exp” 模型的 LlmAgent,指令是執行任務,並在自己是最後一步時把 session 的 status 設為 “completed”。接著建立名為 StatusPoller 的 LoopAgent,設定 max_iterations=10,把 ProcessingStep 和一個 ConditionChecker 實例都納入子 Agent。LoopAgent 會依序執行子 Agent,最多重複 10 輪;一旦 ConditionChecker 發現狀態是 “completed” 就停止。
import asyncio
from typing import AsyncGenerator

from google.adk.agents import LoopAgent, LlmAgent, BaseAgent
from google.adk.events import Event, EventActions
from google.adk.agents.invocation_context import InvocationContext


# Best Practice: Define custom agents as complete, self-describing classes.
class ConditionChecker(BaseAgent):
    """A custom agent that checks for a 'completed' status in the session state."""
    name: str = "ConditionChecker"
    description: str = "Checks if a process is complete and signals the loop to stop."

    async def _run_async_impl(
        self, context: InvocationContext
    ) -> AsyncGenerator[Event, None]:
        """Checks state and yields an event to either continue or stop the loop."""
        status = context.session.state.get("status", "pending")
        is_done = status == "completed"

        if is_done:
            # Escalate to terminate the loop when the condition is met.
            yield Event(author=self.name, actions=EventActions(escalate=True))
        else:
            # Yield a simple event to continue the loop.
            yield Event(author=self.name, content="Condition not met, continuing loop.")


# Correction: The LlmAgent must have a model and clear instructions.
process_step = LlmAgent(
    name="ProcessingStep",
    model="gemini-2.0-flash-exp",
    instruction=(
        "You are a step in a longer process. Perform your task. "
        "If you are the final step, update session state by setting 'status' to 'completed'."
    ),
)


# The LoopAgent orchestrates the workflow.
poller = LoopAgent(
    name="StatusPoller",
    max_iterations=10,
    sub_agents=[
        process_step,
        ConditionChecker(),  # Instantiating the well-defined custom agent.
    ],
)

# This poller will now execute 'process_step'
# and then 'ConditionChecker' repeatedly until the status is 'completed'
# or 10 iterations have passed.
下面這段程式碼說明 Google ADK 中的 SequentialAgent 模式,用於建構線性的工作流程。這段程式碼用 google.adk.agents 函式庫定義了一條循序的 Agent pipeline,由兩個 Agent 組成:step1 和 step2。step1 名為 Step1_Fetch,它的輸出會存進 session 狀態的 data 鍵。step2 名為 Step2_Process,被指示分析 session.state["data"] 中的資訊並給出摘要。名為 “MyPipeline” 的 SequentialAgent 負責調度這些子 Agent 的執行。用初始輸入執行 pipeline 時,step1 先跑,它的回應存入 session 狀態的 “data” 鍵;接著 step2 執行,按照指令利用 step1 放進狀態裡的資訊。這種結構讓你能建構「一個 Agent 的輸出成為下一個的輸入」的工作流程,是打造多步驟 AI 或資料處理 pipeline 的常見模式。
from google.adk.agents import SequentialAgent, Agent


# This agent's output will be saved to session.state["data"]
step1 = Agent(
    name="Step1_Fetch",
    output_key="data",
)

# This agent will use the data from the previous step.
# We instruct it on how to find and use this data.
step2 = Agent(
    name="Step2_Process",
    instruction="Analyze the information found in state['data'] and provide a summary.",
)

pipeline = SequentialAgent(
    name="MyPipeline",
    sub_agents=[step1, step2],
)

# When the pipeline is run with an initial input, Step1 will execute,
# its response will be stored in session.state["data"], and then
# Step2 will execute, using the information from the state as instructed.
下面的範例說明 Google ADK 中的 ParallelAgent 模式,讓多個 Agent 任務並行執行。data_gatherer 設計成同時執行兩個子 Agent:weather_fetcher 和 news_fetcher。weather_fetcher 被指示查詢給定地點的天氣,結果存進 session.state["weather_data"];news_fetcher 則負責抓取給定主題的頭條新聞,存進 session.state["news_data"]。兩個子 Agent 都設定使用 “gemini-2.0-flash-exp” 模型。ParallelAgent 調度這些子 Agent 平行工作,weather_fetcher 和 news_fetcher 的結果都會蒐集起來存進 session 狀態。最後,範例展示了執行完成後如何從 final_state 取得蒐集到的天氣和新聞資料。
from google.adk.agents import Agent, ParallelAgent


# It's better to define the fetching logic as tools for the agents.
# For simplicity in this example, we'll embed the logic in the agent's instruction.
# In a real-world scenario, you would use tools.

# Define the individual agents that will run in parallel
weather_fetcher = Agent(
    name="weather_fetcher",
    model="gemini-2.0-flash-exp",
    instruction="Fetch the weather for the given location and return only the weather report.",
    output_key="weather_data",  # The result will be stored in session.state["weather_data"]
)

news_fetcher = Agent(
    name="news_fetcher",
    model="gemini-2.0-flash-exp",
    instruction="Fetch the top news story for the given topic and return only that story.",
    output_key="news_data",  # The result will be stored in session.state["news_data"]
)

# Create the ParallelAgent to orchestrate the sub-agents
data_gatherer = ParallelAgent(
    name="data_gatherer",
    sub_agents=[
        weather_fetcher,
        news_fetcher,
    ],
)
下面這段程式碼示範 Google ADK 中「Agent 作為工具」(Agent as a Tool)的典範:讓一個 Agent 以類似函式呼叫的方式,使用另一個 Agent 的能力。具體來說,程式碼用 Google 的 LlmAgent 和 AgentTool 類別定義了一個圖片生成系統,由兩個 Agent 組成:父層的 artist_agent 和子層的 image_generator_agent。generate_image 函式是一個模擬圖片生成的簡單工具,回傳假的圖片資料。image_generator_agent 負責根據收到的文字 Prompt 使用這個工具。artist_agent 的角色是先發想一個有創意的圖片 Prompt,再透過 AgentTool 包裝呼叫 image_generator_agent。AgentTool 是那座橋:讓一個 Agent 能把另一個 Agent 當工具用。當 artist_agent 呼叫 image_tool 時,AgentTool 帶著藝術家發想的 Prompt 呼叫 image_generator_agent;後者再用那個 Prompt 執行 generate_image 函式。最後,生成的圖片(或假資料)沿著 Agent 層層回傳。這個架構展示了分層的 Agent 系統:高層 Agent 調度低層的專門 Agent 完成任務。
from google.adk.agents import LlmAgent
from google.adk.tools import agent_tool
from google.genai import types


# 1. A simple function tool for the core capability.
# This follows the best practice of separating actions from reasoning.
def generate_image(prompt: str) -> dict:
    """
    Generates an image based on a textual prompt.

    Args:
        prompt: A detailed description of the image to generate.

    Returns:
        A dictionary with the status and the generated image bytes.
    """
    print(f"TOOL: Generating image for prompt: '{prompt}'")
    # In a real implementation, this would call an image generation API.
    # For this example, we return mock image data.
    mock_image_bytes = b"mock_image_data_for_a_cat_wearing_a_hat"
    return {
        "status": "success",
        # The tool returns the raw bytes, the agent will handle the Part creation.
        "image_bytes": mock_image_bytes,
        "mime_type": "image/png",
    }


# 2. Refactor the ImageGeneratorAgent into an LlmAgent.
# It now correctly uses the input passed to it.
image_generator_agent = LlmAgent(
    name="ImageGen",
    model="gemini-2.0-flash",
    description="Generates an image based on a detailed text prompt.",
    instruction=(
        "You are an image generation specialist. Your task is to take the user's request "
        "and use the `generate_image` tool to create the image. "
        "The user's entire request should be used as the 'prompt' argument for the tool. "
        "After the tool returns the image bytes, you MUST output the image."
    ),
    tools=[generate_image],
)


# 3. Wrap the corrected agent in an AgentTool.
# The description here is what the parent agent sees.
image_tool = agent_tool.AgentTool(
    agent=image_generator_agent,
    description="Use this tool to generate an image. The input should be a descriptive prompt of the desired image.",
)


# 4. The parent agent remains unchanged. Its logic was correct.
artist_agent = LlmAgent(
    name="Artist",
    model="gemini-2.0-flash",
    instruction=(
        "You are a creative artist. First, invent a creative and descriptive prompt for an image. "
        "Then, use the `ImageGen` tool to generate the image using your prompt."
    ),
    tools=[image_tool],
)
速覽
問題: 複雜的問題常常超出單一、單體式 LLM Agent 的能力範圍。一個孤軍奮戰的 Agent 可能缺少多樣的專門技能,或拿不到處理多面向任務各個環節所需的特定工具。這個限制造成瓶頸,拖累系統整體的效果和可擴展性。結果就是:處理複雜的跨領域目標變得沒效率,產出也可能不完整或不夠好。
解法: Multi-Agent Collaboration 模式的標準化解法,是建立一個由多個相互合作的 Agent 組成的系統。複雜的問題被拆成更小、更好處理的子問題,每個子問題指派給一個配備了恰當工具和能力的專門 Agent。這些 Agent 透過明確定義的通訊協定和互動模型合作:循序交接、平行分工、階層委派等等。這種 Agentic 的分散式做法能產生綜效,讓團隊達成任何單一 Agent 都不可能完成的成果。
經驗法則: 當任務對單一 Agent 來說太複雜、且能拆成需要不同專門技能或工具的分立子任務時,就用這個模式。它最適合能受益於多元專業、平行處理,或需要多階段結構化工作流程的問題,例如複雜的研究與分析、軟體開發、創意內容生成。
圖解:
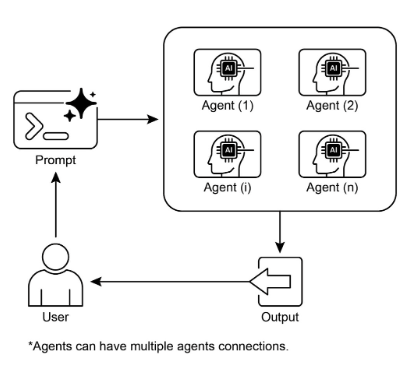
圖 3:Multi-Agent 設計模式。
重點回顧
- Multi-Agent 協作是多個 Agent 為共同目標一起工作。
- 這個模式運用專門化的角色、分散的任務,以及 Agent 之間的通訊。
- 協作的形式包括循序交接、平行處理、辯論、階層結構等。
- 這個模式最適合需要多元專業或多個分立階段的複雜問題。
結語
本章探討了 Multi-Agent Collaboration 模式,展示了在系統中調度多個專門 Agent 的好處。我們檢視了各種協作模型,強調這個模式在處理跨領域、多面向的複雜問題上的關鍵角色。理解了 Agent 之間的協作,自然就會想進一步探究它們與外部環境的互動。
參考資料
- Multi-Agent Collaboration Mechanisms: A Survey of LLMs, https://arxiv.org/abs/2501.06322
- Multi-Agent System — The Power of Collaboration, https://aravindakumar.medium.com/introducing-multi-agent-frameworks-the-power-of-collaboration-e9db31bba1b6