有效的記憶管理,是智慧 Agent 保留資訊的關鍵。和人類一樣,Agent 需要不同類型的記憶才能有效運作。本章深入記憶管理,特別著重 Agent 的即時(短期)與持久(長期)記憶需求。
在 Agent 系統中,記憶指的是 Agent 保留並利用過去互動、觀察和學習經驗中資訊的能力。這個能力讓 Agent 能做出有依據的決策、維持對話上下文,並隨時間持續進步。Agent 的記憶一般分為兩大類:
- 短期記憶(上下文記憶): 類似工作記憶,存放正在處理或最近存取的資訊。對使用大型語言模型(LLM)的 Agent 來說,短期記憶主要存在於上下文視窗(context window)裡:包含當前互動的近期訊息、Agent 的回覆、工具使用的結果、Agent 的反思──這些都會影響 LLM 接下來的回應和行動。上下文視窗容量有限,限制了 Agent 能直接取用的近期資訊量。有效的短期記憶管理,就是把最相關的資訊留在這個有限的空間裡,可能的手法包括摘要較早的對話片段、突顯關鍵細節等。「長上下文」模型的出現只是把這塊短期記憶加大,讓單次互動能容納更多資訊;但這些上下文依然是暫時的,session 一結束就消失,而且每次都要處理一遍,既昂貴又沒效率。因此,Agent 需要另外的記憶類型才能達到真正的持久性:回憶過去互動的資訊、累積長存的知識庫。
- 長期記憶(持久記憶): 這是 Agent 跨互動、跨任務、長時間保留資訊的儲存庫,類似長期知識庫。資料通常存放在 Agent 即時處理環境之外,常見的是資料庫、知識圖譜(knowledge graph)或向量資料庫。在向量資料庫中,資訊被轉成數值向量後儲存,讓 Agent 能依語意相似度(而非關鍵字精確比對)檢索資料,這個過程稱為語意搜尋(semantic search)。當 Agent 需要長期記憶裡的資訊時,它查詢外部儲存、取回相關資料,再整合進短期上下文中立即使用──把既有知識和當前互動接在一起。
實際應用與使用情境
記憶管理讓 Agent 能追蹤資訊、長期保持聰明的表現,是 Agent 超越基本問答能力的必要條件。應用包括:
- 聊天機器人與對話式 AI: 維持對話的流暢靠短期記憶──聊天機器人得記得使用者先前的輸入,回應才會連貫。長期記憶則讓它能想起使用者的偏好、過去的問題或先前的討論,提供個人化、有延續性的互動。
- 任務導向 Agent: 管理多步驟任務的 Agent 需要短期記憶來追蹤先前的步驟、目前進度和整體目標,這些資訊可能放在任務的上下文或暫存空間裡。長期記憶則對取得「不在當前上下文中的使用者相關資料」至關重要。
- 個人化體驗: 提供量身訂做互動的 Agent,用長期記憶儲存和取回使用者偏好、過去行為和個人資訊,據此調整回應和建議。
- 學習與改進: Agent 能從過去的互動中學習、精進表現。成功的策略、犯過的錯、新學到的資訊都存進長期記憶,供未來調整之用。強化學習 Agent 就是這樣儲存學到的策略或知識。
- 資訊檢索(RAG): 負責回答問題的 Agent 會存取一個知識庫──它的長期記憶──通常以檢索增強生成(RAG)實作。Agent 檢索相關文件或資料來支撐回應。
- 自主系統: 機器人或自駕車需要記憶來存放地圖、路線、物體位置和學到的行為:短期記憶處理眼前的環境,長期記憶存放對環境的一般知識。
記憶讓 Agent 能保存歷史、學習、個人化互動,並處理複雜、與時間相關的問題。
實作範例:Google Agent Developer Kit(ADK)的記憶管理
Google ADK 為管理上下文和記憶提供了結構化的方法,並附上可實際應用的元件。要打造需要保留資訊的 Agent,就必須扎實掌握 ADK 的 Session、State 和 Memory。
就像人與人的互動一樣,Agent 需要回想先前交流的能力,對話才會連貫自然。ADK 透過三個核心概念及其對應服務,簡化了上下文管理。
與 Agent 的每一次互動都可以視為一條獨立的對話線程(thread),而 Agent 可能需要取用更早互動的資料。ADK 的結構是這樣的:
- Session: 一條獨立的聊天線程,記錄該次互動的訊息和動作(Events),也儲存與這段對話相關的暫時資料(State)。
- State(
session.state): 存在 Session 裡的資料,只與當前這條活躍的聊天線程相關。 - Memory: 一個可搜尋的資訊庫,資料來自多次過去的聊天或外部來源,是超出當前對話範圍的資料檢索資源。
ADK 為打造複雜、有狀態、能感知上下文的 Agent 所需的關鍵元件提供了專門的服務:SessionService 管理聊天線程(Session 物件)的啟動、記錄和終止;MemoryService 負責長期知識(Memory)的儲存與檢索。
SessionService 和 MemoryService 都有多種設定選項,讓你依應用需求選擇儲存方式。記憶體內(in-memory)的選項適合測試,但資料在重啟後不會保留。若需要持久儲存和擴展性,ADK 也支援資料庫和雲端服務。
Session:追蹤每一場對話
ADK 的 Session 物件負責追蹤和管理個別的聊天線程。與 Agent 的對話開始時,SessionService 會生成一個 Session 物件(google.adk.sessions.Session)。這個物件封裝了與特定對話線程相關的所有資料:唯一識別碼(id、app_name、user_id)、以 Event 物件形式按時間排列的事件記錄、稱為 state 的 session 專屬暫存區,以及最後更新時間戳(last_update_time)。開發者通常透過 SessionService 間接操作 Session 物件。SessionService 負責對話 session 的生命週期管理:開啟新 session、恢復先前的 session、記錄 session 活動(包括狀態更新)、辨識活躍的 session、刪除 session 資料。ADK 提供了多種 SessionService 實作,session 歷史和暫存資料的儲存機制各不相同,例如 InMemorySessionService 適合測試,但應用重啟後資料不會保留。
# Example: Using InMemorySessionService
# This is suitable for local development and testing where data
# persistence across application restarts is not required.
from google.adk.sessions import InMemorySessionService
session_service = InMemorySessionService()
如果想可靠地存到自己管理的資料庫,可以用 DatabaseSessionService。
# Example: Using DatabaseSessionService
# This is suitable for production or development requiring persistent storage.
# You need to configure a database URL (e.g., for SQLite, PostgreSQL, etc.).
# Requires: pip install google-adk[sqlalchemy] and a database driver (e.g., psycopg2 for PostgreSQL)
from google.adk.sessions import DatabaseSessionService
# Example using a local SQLite file:
db_url = "sqlite:///./my_agent_data.db"
session_service = DatabaseSessionService(db_url=db_url)
另外還有 VertexAiSessionService,利用 Vertex AI 基礎設施,適合 Google Cloud 上可擴展的正式環境。
# Example: Using VertexAiSessionService
# This is suitable for scalable production on Google Cloud Platform, leveraging
# Vertex AI infrastructure for session management.
# Requires: pip install google-adk[vertexai] and GCP setup/authentication

from google.adk.sessions import VertexAiSessionService


PROJECT_ID = "your-gcp-project-id"  # Replace with your GCP project ID
LOCATION = "us-central1"  # Replace with your desired GCP location

# The app_name used with this service should correspond to the Reasoning Engine ID or name
REASONING_ENGINE_APP_NAME = (
    "projects/your-gcp-project-id/locations/us-central1/reasoningEngines/your-engine-id"
)  # Replace with your Reasoning Engine resource name

session_service = VertexAiSessionService(project=PROJECT_ID, location=LOCATION)

# When using this service, pass REASONING_ENGINE_APP_NAME to service methods:
# session_service.create_session(app_name=REASONING_ENGINE_APP_NAME, ...)
# session_service.get_session(app_name=REASONING_ENGINE_APP_NAME, ...)
# session_service.append_event(session, event, app_name=REASONING_ENGINE_APP_NAME)
# session_service.delete_session(app_name=REASONING_ENGINE_APP_NAME, ...)
選對 SessionService 很重要,因為它決定了 Agent 的互動歷史和暫存資料怎麼儲存、能保留多久。
每次訊息交換都是一個循環:收到訊息 → Runner 透過 SessionService 取得或建立 Session → Agent 利用 Session 的上下文(state 和歷史互動)處理訊息 → Agent 生成回應、可能更新 state → Runner 把這些封裝成 Event → session_service.append_event 方法記錄新事件並更新儲存中的 state。之後 Session 等待下一則訊息。理想上,互動結束時用 delete_session 方法終止 session。這個流程說明了 SessionService 如何靠管理 Session 專屬的歷史和暫存資料來維持連續性。
State:Session 的便條紙
在 ADK 中,每個代表聊天線程的 Session 都包含一個 state 元件,好比 Agent 在這段對話期間的暫時工作記憶。session.events 記錄完整的聊天歷史,session.state 則儲存並更新與當前對話相關的動態資料點。
本質上,session.state 是一個 dictionary,以鍵值對儲存資料。它的核心功能是讓 Agent 保留並管理對話連貫所需的細節:使用者偏好、任務進度、逐步蒐集的資料、影響後續行動的條件旗標等等。
state 的結構是字串鍵配上可序列化的 Python 型別值,包括字串、數字、布林值,以及由這些基本型別組成的 list 和 dictionary。state 是動態的,隨對話演變;這些變更能保留多久,取決於設定的 SessionService。
state 的組織可以用鍵的前綴來定義資料的範圍和持久性。沒有前綴的鍵是 session 專屬的。
user:前綴把資料跟使用者 ID 綁定,跨所有 session 有效。app:前綴代表應用的所有使用者共享的資料。temp:前綴代表只在當前處理回合有效的資料,不會持久儲存。
Agent 透過單一的 session.state dictionary 存取所有 state 資料,SessionService 負責資料的取回、合併和持久化。state 應該在透過 session_service.append_event() 把 Event 加入 session 歷史時一併更新,這樣才能正確追蹤、在持久化服務中妥善儲存,並安全地處理狀態變更。
1. 簡單做法:使用 output_key(適用於 Agent 的文字回覆)
如果你只是想把 Agent 的最終文字回應直接存進 state,這是最簡單的方法。設定 LlmAgent 時,指定想用的 output_key 即可。Runner 看到它,就會在附加事件時自動建立必要的動作,把回應存進 state。來看一段用 output_key 更新 state 的程式碼範例。
# Import necessary classes from the Google Agent Developer Kit (ADK)
from google.adk.agents import LlmAgent
from google.adk.sessions import InMemorySessionService, Session
from google.adk.runners import Runner
from google.genai.types import Content, Part


# Define an LlmAgent with an output_key.
greeting_agent = LlmAgent(
 name="Greeter",
 model="gemini-2.0-flash",
 instruction="Generate a short, friendly greeting.",
 output_key="last_greeting",
)


# --- Setup Runner and Session ---
app_name, user_id, session_id = "state_app", "user1", "session1"

session_service = InMemorySessionService()

runner = Runner(
    agent=greeting_agent,
    app_name=app_name,
    session_service=session_service,
)

session = session_service.create_session(
    app_name=app_name,
    user_id=user_id,
    session_id=session_id,
)

print(f"Initial state: {session.state}")


# --- Run the Agent ---
user_message = Content(parts=[Part(text="Hello")])

print("\n--- Running the agent ---")
for event in runner.run(
    user_id=user_id,
    session_id=session_id,
    new_message=user_message,
):
    if event.is_final_response():
        print("Agent responded.")


# --- Check Updated State ---
# Correctly check the state after the runner has finished processing all events.
updated_session = session_service.get_session(app_name, user_id, session_id)
print(f"\nState after agent run: {updated_session.state}")
在幕後,Runner 看到你的 output_key,會在呼叫 append_event 時自動建立帶 state_delta 的必要動作。
2. 標準做法:使用 EventActions.state_delta(適用於較複雜的更新)
當你需要做更複雜的事──一次更新多個鍵、儲存非文字的內容、指定 user: 或 app: 這類範圍、或做與 Agent 最終文字回覆無關的更新──你就要手動建一個記錄狀態變更的 dictionary(state_delta),放進要附加的 Event 的 EventActions 裡。來看一個例子:
import time

from google.adk.tools.tool_context import ToolContext
from google.adk.sessions import InMemorySessionService


# --- Define the Recommended Tool-Based Approach ---
def log_user_login(tool_context: ToolContext) -> dict:
    """
    Updates the session state upon a user login event.
    This tool encapsulates all state changes related to a user login.

    Args:
        tool_context: Automatically provided by ADK, gives access to session state.

    Returns:
        A dictionary confirming the action was successful.
    """
    # Access the state directly through the provided context.
    state = tool_context.state

    # Get current values or defaults, then update the state.
    # This is much cleaner and co-locates the logic.
    login_count = state.get("user:login_count", 0) + 1
    state["user:login_count"] = login_count
    state["task_status"] = "active"
    state["user:last_login_ts"] = time.time()
    state["temp:validation_needed"] = True

    print("State updated from within the `log_user_login` tool.")

    return {
        "status": "success",
        "message": f"User login tracked. Total logins: {login_count}.",
    }


# --- Demonstration of Usage ---
# In a real application, an LLM Agent would decide to call this tool.
# Here, we simulate a direct call for demonstration purposes.

# 1. Setup
session_service = InMemorySessionService()
app_name, user_id, session_id = "state_app_tool", "user3", "session3"

session = session_service.create_session(
    app_name=app_name,
    user_id=user_id,
    session_id=session_id,
    state={"user:login_count": 0, "task_status": "idle"},
)

print(f"Initial state: {session.state}")

# 2. Simulate a tool call (in a real app, the ADK Runner does this)
# We create a ToolContext manually just for this standalone example.
from google.adk.tools.tool_context import InvocationContext

mock_context = ToolContext(
    invocation_context=InvocationContext(
        app_name=app_name,
        user_id=user_id,
        session_id=session_id,
        session=session,
        session_service=session_service,
    )
)

# 3. Execute the tool
log_user_login(mock_context)

# 4. Check the updated state
updated_session = session_service.get_session(app_name, user_id, session_id)
print(f"State after tool execution: {updated_session.state}")

# Expected output will show the same state change as the "Before" case,
# but the code organization is significantly cleaner and more robust.
這段程式碼示範用「工具」來管理應用中的使用者 session 狀態。它定義了一個作為工具的函式 log_user_login,負責在使用者登入時更新 session 狀態。 函式接收一個由 ADK 提供的 ToolContext 物件,用它存取和修改 session 的 state dictionary。工具內部會遞增 user:login_count、把 task_status 設為 “active”、記錄 user:last_login_ts(時間戳),並加上一個暫時旗標 temp:validation_needed。
程式碼的示範部分模擬了這個工具的使用方式:先建立一個 in-memory 的 session 服務、用一些預設狀態建立初始 session,再手動建立一個 ToolContext 來模擬 ADK Runner 執行工具的環境,然後用這個模擬的 context 呼叫 log_user_login。最後重新取得 session,確認狀態已被工具的執行更新。重點在於展示:把狀態變更封裝在工具裡,比在工具之外直接操作狀態,程式碼更乾淨、更有組織。
要注意:取得 session 之後直接修改 session.state dictionary 是強烈不建議的做法,因為它繞過了標準的事件處理機制。這種直接變更不會記錄在 session 的事件歷史裡、可能不會被所選的 SessionService 持久化、可能引發並行問題,也不會更新時間戳等必要的中繼資料。更新 session 狀態的建議方法是:在 LlmAgent 上使用 output_key 參數(專用於 Agent 的最終文字回應),或在透過 session_service.append_event() 附加事件時,把狀態變更放進 EventActions.state_delta。session.state 應該主要用來讀取既有資料。
總結一下設計 state 的原則:保持簡單、使用基本資料型別、鍵名清楚並正確使用前綴、避免深層巢狀,永遠透過 append_event 流程更新狀態。
Memory:用 MemoryService 管理長期知識
在 Agent 系統中,Session 元件保存的是單一對話的即時聊天歷史(events)和暫存資料(state)。但 Agent 要跨多次互動保留資訊、或存取外部資料,就需要長期知識管理──這由 MemoryService 負責。
# Example: Using InMemoryMemoryService
# This is suitable for local development and testing where data
# persistence across application restarts is not required.
# Memory content is lost when the app stops.

from google.adk.memory import InMemoryMemoryService

memory_service = InMemoryMemoryService()
可以把 Session 和 State 想成單一聊天 session 的短期記憶,而 MemoryService 管理的長期知識,則是一個持久、可搜尋的儲存庫,內容可能來自多次過去的互動或外部來源。MemoryService 由 BaseMemoryService 介面定義,為管理這種可搜尋的長期知識立下標準。它的主要功能有二:新增資訊──用 add_session_to_memory 方法從 session 抽取內容並儲存;檢索資訊──讓 Agent 用 search_memory 方法查詢儲存庫、取得相關資料。
ADK 為建立長期知識庫提供了幾種實作。InMemoryMemoryService 是暫時性的儲存方案,適合測試,但應用重啟後資料不保留。正式環境通常使用 VertexAiRagMemoryService:它利用 Google Cloud 的檢索增強生成(RAG)服務,提供可擴展、持久、支援語意搜尋的能力(另見第 14 章 RAG)。
# Example: Using VertexAiRagMemoryService
# This is suitable for scalable production on GCP, leveraging
# Vertex AI RAG (Retrieval Augmented Generation) for persistent,
# searchable memory.
# Requires: pip install google-adk[vertexai], GCP
# setup/authentication, and a Vertex AI RAG Corpus.

from google.adk.memory import VertexAiRagMemoryService


# The resource name of your Vertex AI RAG Corpus
RAG_CORPUS_RESOURCE_NAME = (
    "projects/your-gcp-project-id/locations/us-central1/ragCorpora/your-corpus-id"
)  # Replace with your Corpus resource name

# Optional configuration for retrieval behavior
SIMILARITY_TOP_K = 5  # Number of top results to retrieve
VECTOR_DISTANCE_THRESHOLD = 0.7  # Threshold for vector similarity

memory_service = VertexAiRagMemoryService(
    rag_corpus=RAG_CORPUS_RESOURCE_NAME,
    similarity_top_k=SIMILARITY_TOP_K,
    vector_distance_threshold=VECTOR_DISTANCE_THRESHOLD,
)

# When using this service, methods like add_session_to_memory
# and search_memory will interact with the specified Vertex AI
# RAG Corpus.
實作範例:LangChain 與 LangGraph 的記憶管理
在 LangChain 和 LangGraph 中,Memory 是打造聰明、自然的對話應用的關鍵元件。它讓 AI Agent 記得過去互動的資訊、從回饋中學習、適應使用者的偏好。LangChain 的記憶功能提供了基礎:參考儲存的歷史來豐富當前的 Prompt,再把最新的交流記錄下來供未來使用。隨著 Agent 處理的任務越來越複雜,這個能力對效率和使用者滿意度都不可或缺。
短期記憶: 以線程(thread)為範圍,追蹤單一 session 或線程內正在進行的對話。它提供即時的上下文,但完整的歷史可能撐爆 LLM 的上下文視窗,導致錯誤或表現下滑。LangGraph 把短期記憶作為 Agent 狀態的一部分管理,透過 checkpointer 持久化,讓線程隨時可以恢復。
長期記憶: 跨 session 儲存使用者專屬或應用層級的資料,在對話線程之間共享。它以自訂的「命名空間」(namespace)儲存,任何線程隨時都能取用。LangGraph 提供 store 來儲存和取回長期記憶,讓 Agent 能無限期保留知識。
LangChain 為管理對話歷史提供了多種工具,從手動控制到自動整合進鏈裡都有。
ChatMessageHistory:手動記憶管理。 想在正式的鏈之外,直接、簡單地控制對話歷史,ChatMessageHistory 類別最合適。它讓你手動追蹤對話的往來。
from langchain.memory import ChatMessageHistory


# Initialize the history object
history = ChatMessageHistory()

# Add user and AI messages
history.add_user_message("I'm heading to New York next week.")
history.add_ai_message("Great! It's a fantastic city.")

# Access the list of messages
print(history.messages)
ConversationBufferMemory:鏈的自動記憶。 想把記憶直接整合進鏈裡,ConversationBufferMemory 是常見的選擇。它保存對話的緩衝區,供你的 Prompt 使用。行為可以用兩個關鍵參數自訂:
memory_key:字串,指定 Prompt 中存放聊天歷史的變數名稱,預設是 “history”。return_messages:布林值,決定歷史的格式。False(預設)回傳單一格式化字串,適合標準 LLM。True回傳訊息物件的 list,是 Chat Model 的建議格式。
from langchain.memory import ConversationBufferMemory


# Initialize memory
memory = ConversationBufferMemory()

# Save a conversation turn
memory.save_context(
    {"input": "What's the weather like?"},
    {"output": "It's sunny today."},
)

# Load the memory as a string
print(memory.load_memory_variables({}))
把這個記憶整合進 LLMChain,模型就能取用對話歷史、給出符合上下文的回應。
from langchain_openai import OpenAI
from langchain.chains import LLMChain
from langchain.prompts import PromptTemplate
from langchain.memory import ConversationBufferMemory


# 1. Define LLM and Prompt
llm = OpenAI(temperature=0)

template = """You are a helpful travel agent.
Previous conversation: {history}
New question: {question}
Response:"""
prompt = PromptTemplate.from_template(template)

# 2. Configure Memory
# The memory_key "history" matches the variable in the prompt
memory = ConversationBufferMemory(memory_key="history")

# 3. Build the Chain
conversation = LLMChain(llm=llm, prompt=prompt, memory=memory)

# 4. Run the Conversation
response = conversation.predict(question="I want to book a flight.")
print(response)

response = conversation.predict(question="My name is Sam, by the way.")
print(response)

response = conversation.predict(question="What was my name again?")
print(response)
搭配 Chat Model 時,建議設定 return_messages=True,用結構化的訊息物件 list,效果更好。
from langchain_openai import ChatOpenAI
from langchain.chains import LLMChain
from langchain.memory import ConversationBufferMemory
from langchain_core.prompts import (
    ChatPromptTemplate,
    MessagesPlaceholder,
    SystemMessagePromptTemplate,
    HumanMessagePromptTemplate,
)


# 1. Define Chat Model and Prompt
llm = ChatOpenAI()

prompt = ChatPromptTemplate(
    messages=[
        SystemMessagePromptTemplate.from_template("You are a friendly assistant."),
        MessagesPlaceholder(variable_name="chat_history"),
        HumanMessagePromptTemplate.from_template("{question}"),
    ]
)

# 2. Configure Memory
# return_messages=True is essential for chat models
memory = ConversationBufferMemory(memory_key="chat_history", return_messages=True)

# 3. Build the Chain
conversation = LLMChain(llm=llm, prompt=prompt, memory=memory)

# 4. Run the Conversation
response = conversation.predict(question="Hi, I'm Jane.")
print(response)

response = conversation.predict(question="Do you remember my name?")
print(response)
長期記憶的類型: 長期記憶讓系統能跨對話保留資訊,帶來更深層的情境理解與個人化。可以類比人類記憶,分成三種:
- 語意記憶(Semantic Memory)──記住事實: 保留特定的事實和概念,例如使用者偏好或領域知識。它用來讓 Agent 的回應有所依據,互動更個人化、更貼題。這些資訊可以用一份持續更新的使用者「檔案」(一份 JSON 文件)管理,也可以是一批個別事實文件的「集合」。
- 情節記憶(Episodic Memory)──記住經驗: 回想過去的事件或行動。對 AI Agent 來說,情節記憶常用來記住「某個任務怎麼完成的」。實務上經常透過 few-shot 範例 Prompt 來實作:Agent 從過去成功的互動序列中學習如何正確完成任務。
- 程序記憶(Procedural Memory)──記住規則: 這是「怎麼做事」的記憶──Agent 的核心指令和行為,通常放在它的系統 Prompt 裡。Agent 修改自己的 Prompt 來適應和進步是常見做法。一種有效的技巧是「Reflection」:把 Agent 當前的指令和近期互動餵給它,請它改進自己的指令。
下面是一段虛擬碼,示範 Agent 如何用 reflection 更新存放在 LangGraph BaseStore 裡的程序記憶。
# Node that updates the agent's instructions
def update_instructions(state: State, store: BaseStore):
    namespace = ("instructions",)

    # Get the current instructions from the store
    current_instructions = store.search(namespace)[0]

    # Create a prompt to ask the LLM to reflect on the conversation
    # and generate new, improved instructions
    prompt = prompt_template.format(
        instructions=current_instructions.value["instructions"],
        conversation=state["messages"],
    )

    # Get the new instructions from the LLM
    output = llm.invoke(prompt)
    new_instructions = output["new_instructions"]

    # Save the updated instructions back to the store
    store.put(("agent_instructions",), "agent_a", {"instructions": new_instructions})


# Node that uses the instructions to generate a response
def call_model(state: State, store: BaseStore):
    namespace = ("agent_instructions",)

    # Retrieve the latest instructions from the store
    instructions = store.get(namespace, key="agent_a")[0]

    # Use the retrieved instructions to format the prompt
    prompt = prompt_template.format(
        instructions=instructions.value["instructions"]
    )
    # ... application logic continues
LangGraph 把長期記憶以 JSON 文件的形式存在 store 裡。每筆記憶都放在自訂的命名空間(像資料夾)和一個獨立的鍵(像檔名)之下。這種階層式結構讓資訊容易整理和取回。下面的程式碼示範用 InMemoryStore 來 put、get、search 記憶。
from langgraph.store.memory import InMemoryStore


# A placeholder for a real embedding function
def embed(texts: list[str]) -> list[list[float]]:
    # In a real application, use a proper embedding model
    return [[1.0, 2.0] for _ in texts]


# Initialize an in-memory store. For production, use a database-backed store.
store = InMemoryStore(index={"embed": embed, "dims": 2})

# Define a namespace for a specific user and application context
user_id = "my-user"
application_context = "chitchat"
namespace = (user_id, application_context)

# 1. Put a memory into the store
store.put(
    namespace,
    "a-memory",  # The key for this memory
    {
        "rules": [
            "User likes short, direct language",
            "User only speaks English & python",
        ],
        "my-key": "my-value",
    },
)

# 2. Get the memory by its namespace and key
item = store.get(namespace, "a-memory")
print("Retrieved Item:", item)

# 3. Search for memories within the namespace, filtering by content
# and sorting by vector similarity to the query.
items = store.search(
    namespace,
    filter={"my-key": "my-value"},
    query="language preferences",
)
print("Search Results:", items)
Vertex Memory Bank
Memory Bank 是 Vertex AI Agent Engine 中的受管服務,為 Agent 提供持久的長期記憶。這個服務用 Gemini 模型非同步地分析對話歷史,抽取關鍵事實和使用者偏好。
這些資訊會持久儲存,依定義的範圍(例如使用者 ID)組織,並且會有智慧地更新:整併新資料、解決矛盾。新 session 開始時,Agent 透過完整資料回憶或 embedding 相似度搜尋取回相關記憶。這個流程讓 Agent 能跨 session 維持連續性,根據回想起的資訊給出個人化的回應。
Agent 的 runner 與先初始化好的 VertexAiMemoryBankService 互動。這個服務負責自動儲存 Agent 對話中產生的記憶。每筆記憶都標上唯一的 USER_ID 和 APP_NAME,確保未來能精準取回。
from google.adk.memory import VertexAiMemoryBankService


agent_engine_id = agent_engine.api_resource.name.split("/")[-1]

memory_service = VertexAiMemoryBankService(
    project="PROJECT_ID",
    location="LOCATION",
    agent_engine_id=agent_engine_id,
)

session = await session_service.get_session(
    app_name=app_name,
    user_id="USER_ID",
    session_id=session.id,
)

await memory_service.add_session_to_memory(session)
Memory Bank 與 Google ADK 無縫整合,開箱即用。對 LangGraph、CrewAI 等其他 Agent 框架的使用者,Memory Bank 也透過直接的 API 呼叫提供支援。有興趣的讀者可以參考網路上現成的整合範例。
速覽
問題: Agentic 系統需要記住過去互動的資訊,才能執行複雜任務、提供連貫的體驗。沒有記憶機制的 Agent 是無狀態的:無法維持對話上下文、無法從經驗中學習、無法為使用者提供個人化的回應。這從根本上把它們限制在簡單的一次性互動,應付不了多步驟流程或不斷變化的使用者需求。核心問題是:如何同時有效管理「單一對話的即時暫存資訊」和「長時間累積的大量持久知識」。
解法: 標準化的解法是實作一套雙元件的記憶系統,區分短期與長期儲存。短期的上下文記憶把近期互動資料放在 LLM 的上下文視窗裡,維持對話的流暢。必須持久保存的資訊,則交給長期記憶方案:使用外部資料庫(通常是向量儲存),支援高效的語意檢索。Google ADK 這類 Agentic 框架提供了對應的元件:Session 管理對話線程、State 管理它的暫存資料,專門的 MemoryService 則負責對接長期知識庫,讓 Agent 能取回過去的相關資訊、納入當前的上下文。
經驗法則: 當 Agent 要做的不只是回答單一問題時,就用這個模式。必須在對話全程維持上下文、追蹤多步驟任務進度、或靠回憶使用者偏好與歷史來提供個人化互動的 Agent,都少不了它。只要期望 Agent 根據過去的成功、失敗或新資訊來學習或調整,就實作記憶管理。
圖解:
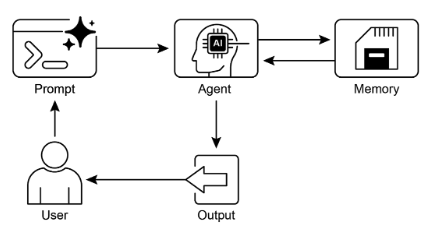
圖 1:Memory Management 設計模式。
重點回顧
快速回顧記憶管理的重點:
- 記憶對 Agent 追蹤資訊、學習、個人化互動非常重要。
- 對話式 AI 同時仰賴短期記憶(單次聊天的即時上下文)和長期記憶(跨 session 的持久知識)。
- 短期記憶(眼前的東西)是暫時的,通常受限於 LLM 的上下文視窗或框架傳遞上下文的方式。
- 長期記憶(留得下來的東西)用向量資料庫這類外部儲存跨對話保存資訊,靠搜尋來取用。
- ADK 這類框架有專門的元件來管理記憶:Session(聊天線程)、State(聊天暫存資料)、MemoryService(可搜尋的長期知識)。
- ADK 的 SessionService 管理聊天 session 的完整生命週期,包括歷史(events)和暫存資料(state)。
- ADK 的 session.state 是聊天暫存資料的 dictionary;前綴(user:、app:、temp:)標明資料屬於哪裡、會不會留下來。
- 在 ADK 中,更新 state 應該在附加事件時透過 EventActions.state_delta 或 output_key,而不是直接改 state dictionary。
- ADK 的 MemoryService 負責把資訊放進長期儲存,讓 Agent 能搜尋,通常透過工具使用。
- LangChain 提供 ConversationBufferMemory 這類實用工具,自動把單一對話的歷史注入 Prompt,讓 Agent 能回想即時上下文。
- LangGraph 透過 store 實現進階的長期記憶:跨使用者 session 儲存和取回語意事實、情節經驗,甚至可更新的程序規則。
- Memory Bank 是受管服務,自動抽取、儲存、回想使用者專屬資訊,為 Agent 提供持久的長期記憶,支援 Google ADK、LangGraph、CrewAI 等框架,實現個人化、有延續性的對話。
結語
本章深入了 Agent 系統中記憶管理這個要緊的工作,說明了「短暫的上下文」和「長存的知識」之間的差別。我們談了這些記憶類型怎麼架設、在打造更聰明的 Agent 時用在哪裡,並詳細看了 Google ADK 提供的元件:Session、State、MemoryService。談完了 Agent 怎麼記住東西(短期和長期),接下來就能談它們怎麼學習和調整。下一個模式「Learning and Adaptation」,講的是 Agent 根據新的經驗或資料,改變它的思考、行動或知識。
參考資料
- ADK Memory, https://google.github.io/adk-docs/sessions/memory/
- LangGraph Memory, https://langchain-ai.github.io/langgraph/concepts/memory/
- Vertex AI Agent Engine Memory Bank, https://cloud.google.com/blog/products/ai-machine-learning/vertex-ai-memory-bank-in-public-preview